 |
Find it in the guides at
HillCountryHome.com
|
|
 HOME HOME 
|
|
FEATURED PROPERTY |
|
FEATURED ARTICLES |
|
ADVERTISING INFO
|
|
 BUILDING BUILDING
|
| Architects,
Design |
| Homebuilders |
| Construction |
Manufactured
Homes
 |
|
BUYING
|
| Agents
& Brokers |
| Developments |
| Inspection
Services |
Mortgage &
Title |
| Property Insurance |
Surveying
Services
|
|
EXTERIOR
SERVICES
|
| Concrete |
| Decks, Gazebos |
| Driveways, Roads |
| Fences,
Gates |
| Landscaping, Trees |
| Pools,
Fountains |
| Roofing |
Stonework, Masonry
|
|
INTERIOR
SERVICES |
| Finish
Work |
| Floors |
| Furnishings & Decor |
| Interior
Design |
| Painting,
Drywall |
Tile
& Tilework
|
| MORE
SERVICES |
| Cleaning,
Disposal |
| Equipment,
Rental and Repair |
| Moving,
Storage |
| Pest
Control |
| Repairs,
Maintenance |
| Security Services |
Supplies and Materials
|
| UTILITIES |
| AC,
Heating |
| Communications & AV |
| Electrical,
Gas, Solar |
| Plumbing |
| Rainwater
Collection |
Water, Wells & Septic
|
GET ON THE GUIDE!
|
 |
|

|
|
 |
Rainwater Harvesting Made Simple, Part One
|
|
| Harvesting water from the sky. |
|
 |
|
It's now clear to planners that the water supplies we depend on, used daily for water in households throughout the hill country, will far too soon become insufficient to meet demand.

| Capturing rain from a roof can result in surprising amounts of clean water.
|
|
Water in the Hill Country comes from surface and groundwater supplies. The population is growing, the supply is decreasing, and demand will outstrip supply of conventional sources.
Fortunately, there is a logical alternative to sourcing from groundwater and the finite amounts in the Buchanan and Travis reservoirs, but so far few people have been taking advantage of a natural solution.
Rainwater harvesting captures, diverts and stores rainwater that can be used for all household and landscaping needs. Texas settlers captured precious water with cisterns, and many ranchers still rely on them. So why are so few homeowners jumping in to reap nature's bounty?

| Hollon prepares to measure water in the tank by connecting clear tubing. Capping the end of the tubing during connection (in this case with a thumb) and uncapping after raising it to tank height creates a perfect, low cost, no-maintenance measurement tool.
|
|
Most of today's homes were not initially designed to incorporate such systems and many of us, quite understandably, don't know where to begin.
If tens of thousands of dollars are not available to acquire the perfect system, we may simply sigh and brush the thought aside for another day. Sure, we may feel a little guilty about draining the groundwater supply and extremely annoyed at the size of the water bill each month, but what can we do?
The good news is that almost anyone can begin to enjoy immediate benefits of rainwater collection, by starting simple and starting small. It doesn't take a lot of surface area to begin reaping results. For every inch of rain that falls on a catchment area of 1,000 square feet, you can expect to collect approximately 600 gallons of rainwater. Ten inches of that rain gives you 6,000 gallons of water!
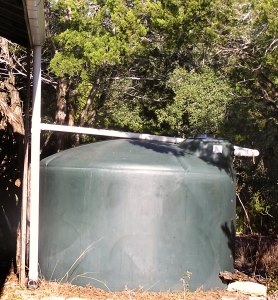
| The 1,550 gallon tank with connections. The lower section of the drainpipe acts as a roof washer; when full, rainwater is diverted into the catchment tank, ensuring the collection of clean water.
|
|
Jack Hollon began the transition of his water supply to a sustainable rainwater capture system with a 1550 gallon polyethylene tank. Polyethylene tanks can be used above or below ground, are usually less expensive than other options, are light in weight and easy to move around, and are UV resistant. Other rainwater tank choices are fiberglass, metal, and concrete.
Getting the tank to the location was simple. At this size point, the tank was small enough for on-site delivery via a standard size driveway/access, eliminating one issue that can arise with larger tanks.
Jack planned this as a DIY project and had a perfect location for water collection...the roof of a storage shed. His goal was modest, to collect enough water to sustain his garden and landscaping. Although he began the installation toward the end of one of our central Texas 18-month droughts, his research had convinced him that he could expect his system to meet this demand.
To make sure the tank's location was a smooth, flat surface, Jack measured the required diameter and created a "pad" of sand, framed with weather-treated lumber. With a system of levers, he seated the tank by himself. Once the tank was set, it was time to make a pathway to it for the water from the sky.
Removing overhanging branches to keep this path litter free, Jack installed the gutters. The downspout was installed at the end next to the tank. A T-connection was added about halfway down to take the water to the tank. To make sure that only clean water reached the tank, he used the downspout from below that point as a roof washer. A roof washer is used to remove sediment and debris from the collection surface of the roof during the first short period of rainfall. The roof washer can be as simple as an extension of the drainpipe below the tank intake point. Water from the roof must fill this pipe first, and this diversion was the ideal solution in Jack's project. (See photo.)
Experts caution that a good roof washer should incorporate a corrosion-resistant debris screen, like the one Jack added. They should also be installed in a way that's easily accessible for regular maintenance and cleaning, when necessary. The rule of thumb is automatic diversion of the first .02 inches of rainfall per 24 hour period per square foot of roof area. It doesn't seem like much, but will make all the difference in the quality of collected water.

| The 3,000 gallon tank for use as part of the whole house rainwater system.
|
|
Once the connection from the downspout to the tank was completed, water collection could begin. The results of Jack's project have been very successful. The tank filled quickly when a long-awaited rainfall came shortly after he installed the system, and the tank has remained full since then. Jack has not only used the water for all his plants, but likes the water quality so much that he uses it for his morning coffee as well.
Jack is sold on the value and desirability of rainwater collection and has already bought two more tanks, one more 1,550 gallon tank and one 3,000 gallon tank. He has set them in place next to his house and is in the process of installing the guttering, a filter system, a bladder tank, and a diverter for his well plumbing. Although he doesn't anticipate requiring well water at all once his new system is working, this plan gives him the option of using well water occasionally if he should need it.
Materials for this system have so far cost Jack less than $800. The tank cost approximately $600., and he spent around $100. for the guttering and plumbing pipes, and a few dollars for the sand. He is projecting that total costs for materials only for this new system will run between $5,000. to $7,000. Jack saved money by installing everything himself, but even with a help of a professional, this project can be very cost-effective. Polyethylene tanks usually have a 20-year warranty and regular maintenance will prevent the necessity for further major investment.
If time and skill levels don't permit your doing this yourself, check out the guide for a professional who can install your own sustainable solution for the 21st century.
USEFUL LINKS
|
|
|
|
|
|
|
|
|
|
|
in Central Texas
|
|
|
|

|
|
|


